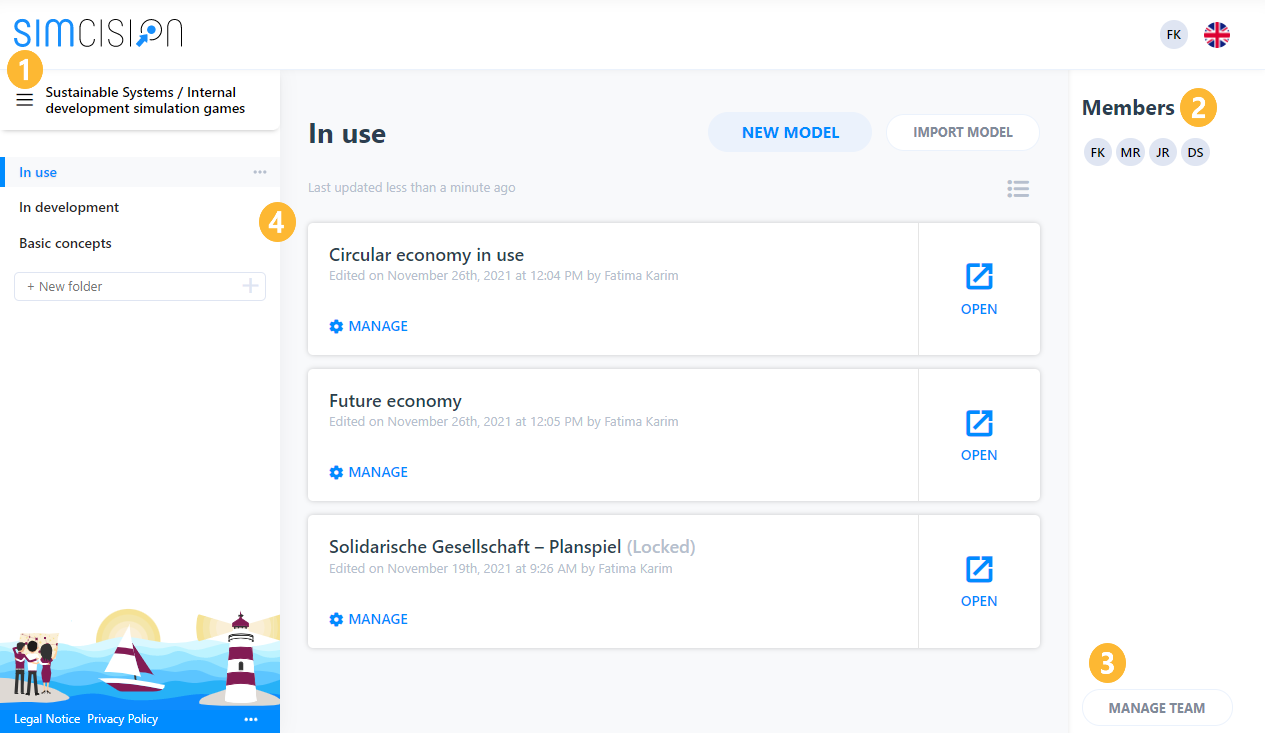
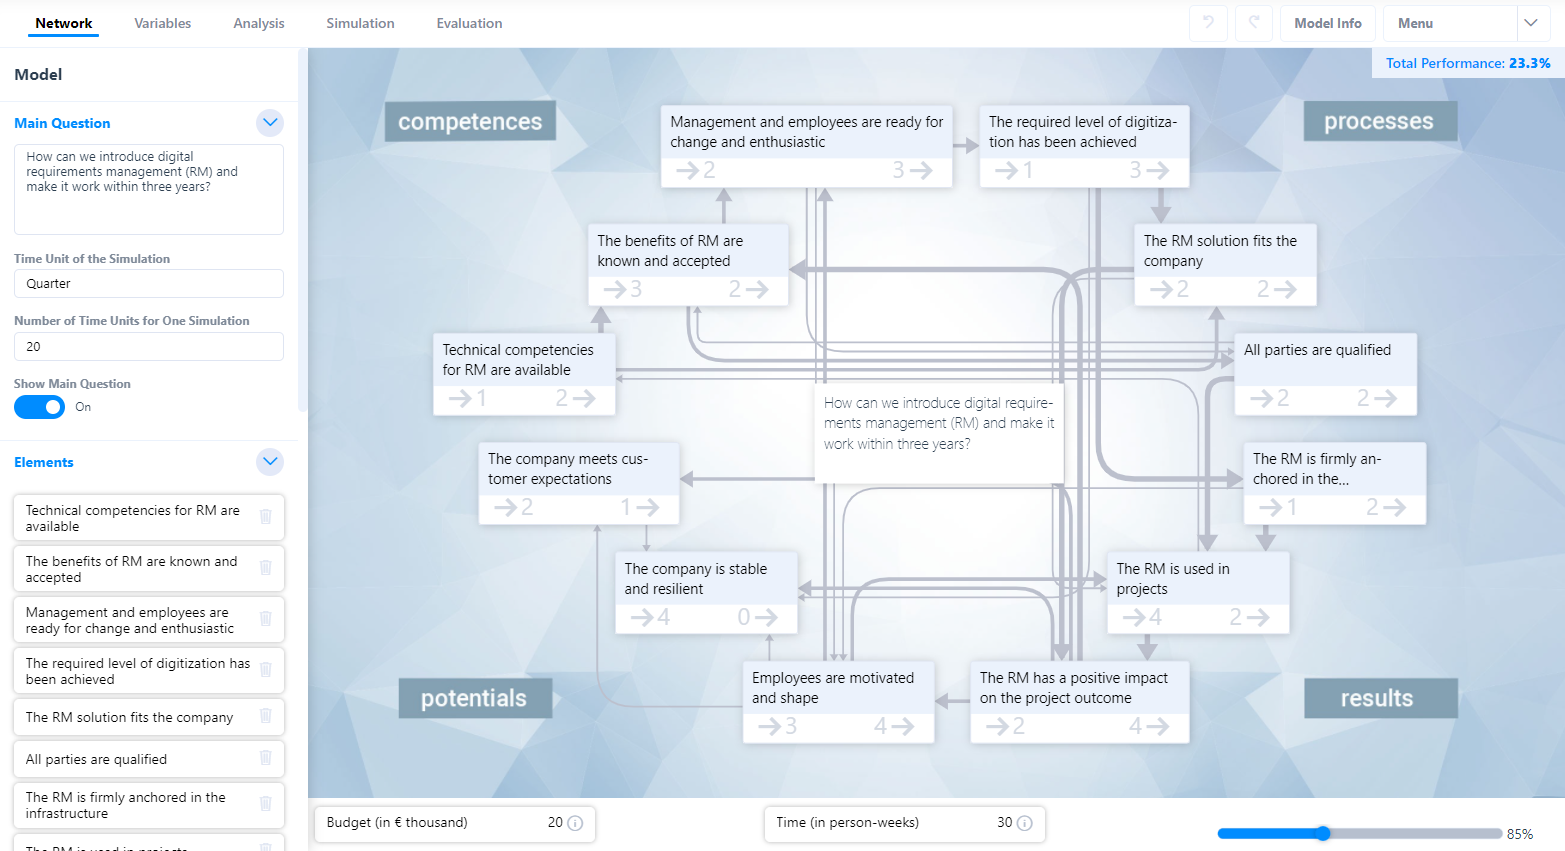
Model creation

Overview effect network

In the effect network area, you can model a system. To create an effect network, first of all the system boundaries are determined, relevant stakeholders are recorded, the individual system elements are described with their indicators, elements are weighted, element states are evaluated, and relationships between elements are created and analyzed.

In our Youtube-Tutorial you will find detailed insights on how to create a model.
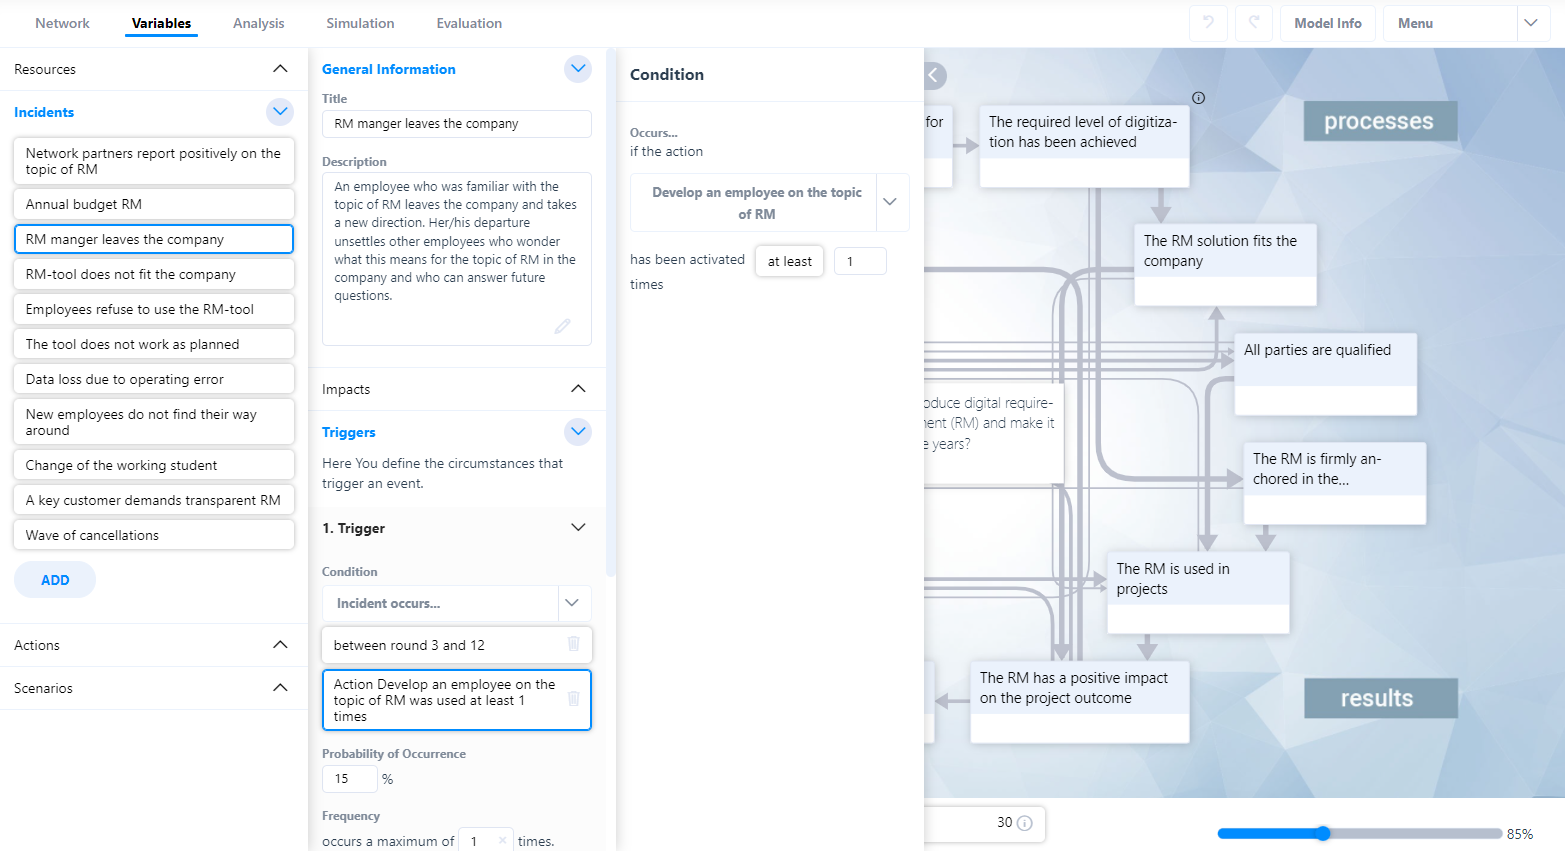
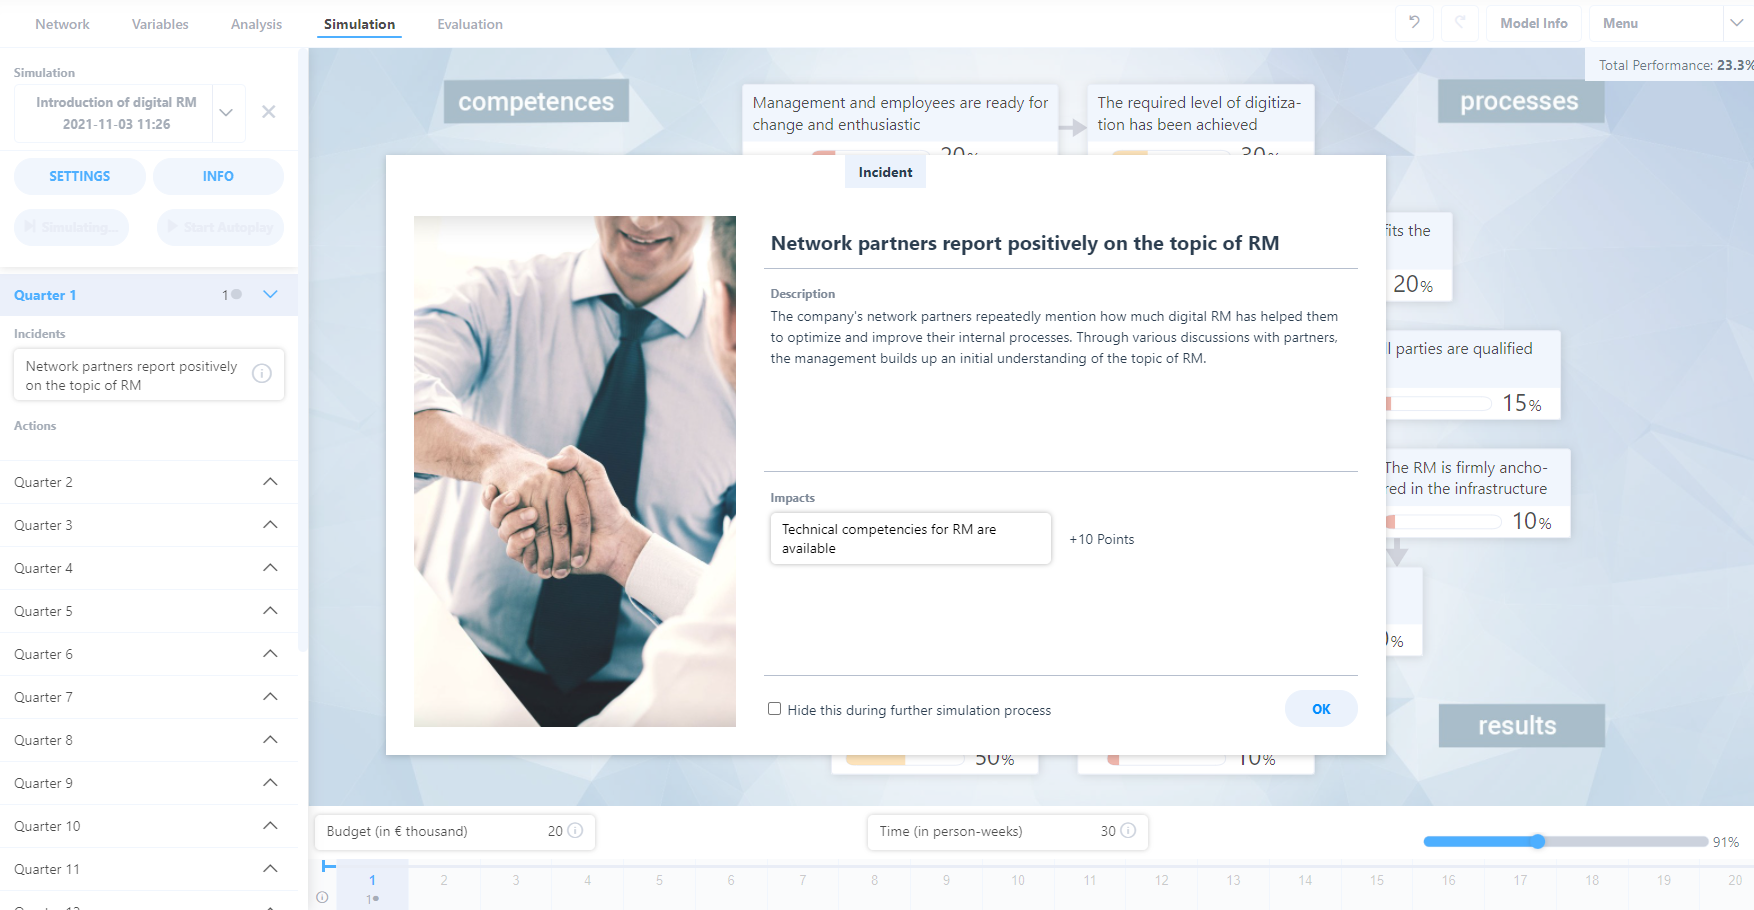
Overview variables

In the variables area, you can define resources, events and actions as system influences, which are then available in the simulation area.

  • Resources can be tangible as well as intangible.
  • Events are triggered automatically in the simulation according to defined triggers.
  • Measures are actively selected and triggered in the simulation.
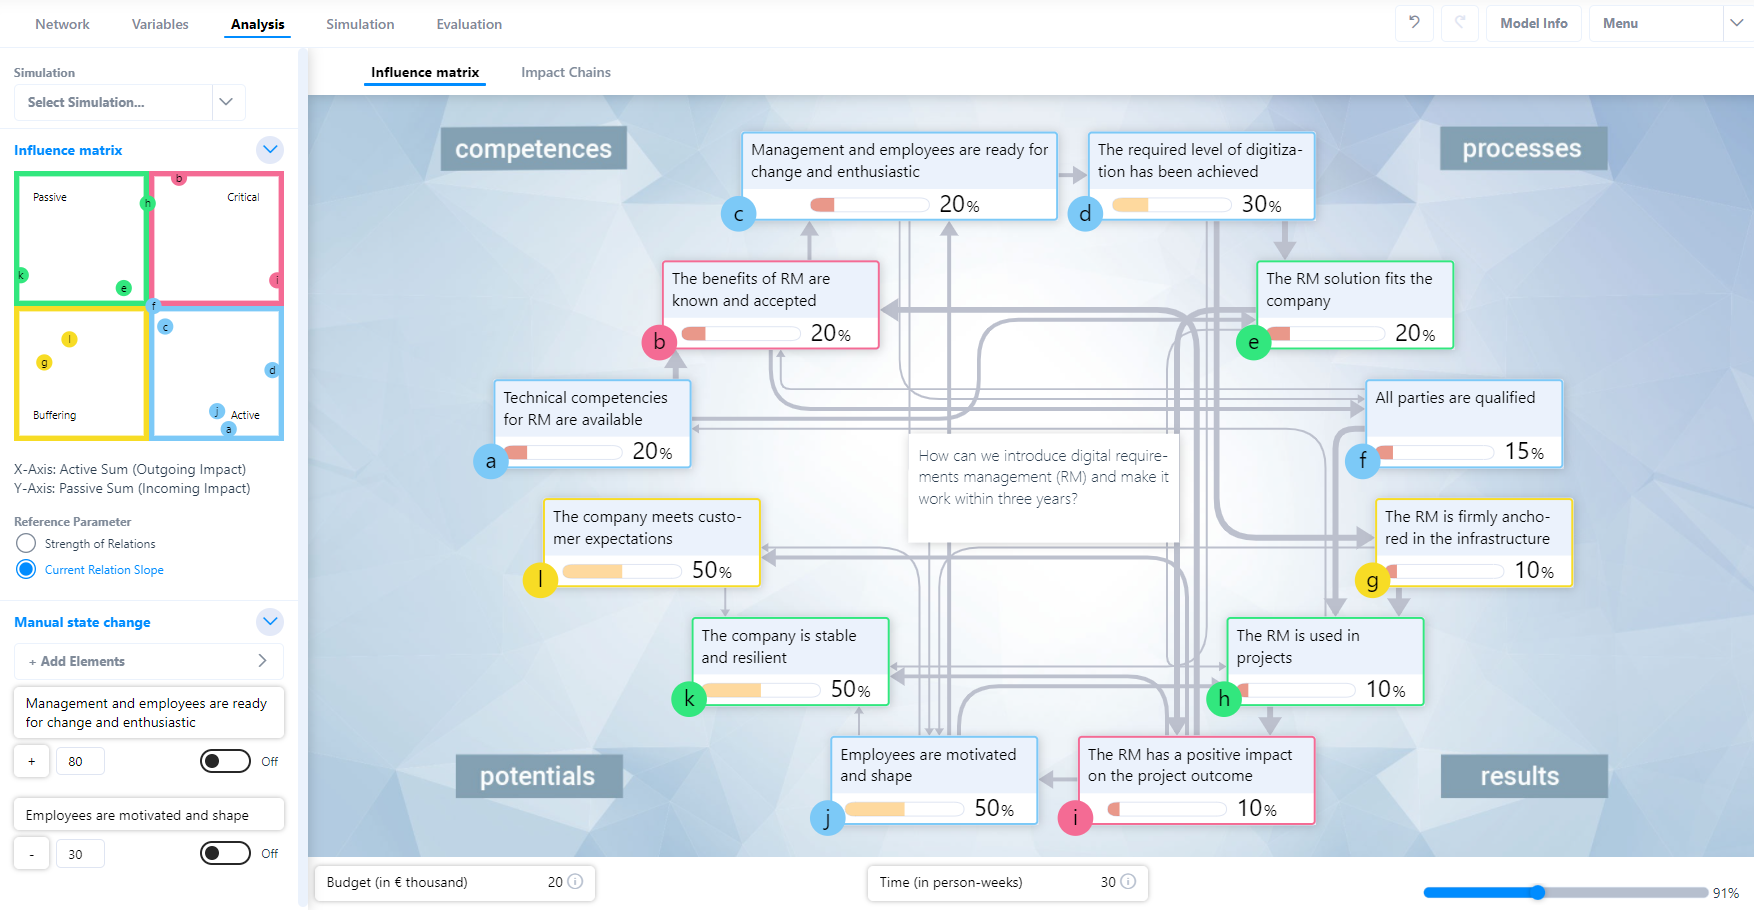
Overview analysis

The analysis area includes the sub-areas influence matrix and impact chains, which support the development of system understanding and can be used to identify levers and relevant system dynamics.

  • The influence matrix shows the influence strengths and legibility of the individual elements.
  • In the impact chains area, ways and cycles between elements can be analyzed.

Overview simulation

In the simulation area you can run, analyze and compare any number of simulations based on the effect network and defined variables. Simulations are suitable for building and conveying systems understanding, as well as for experimentation and strategy development.
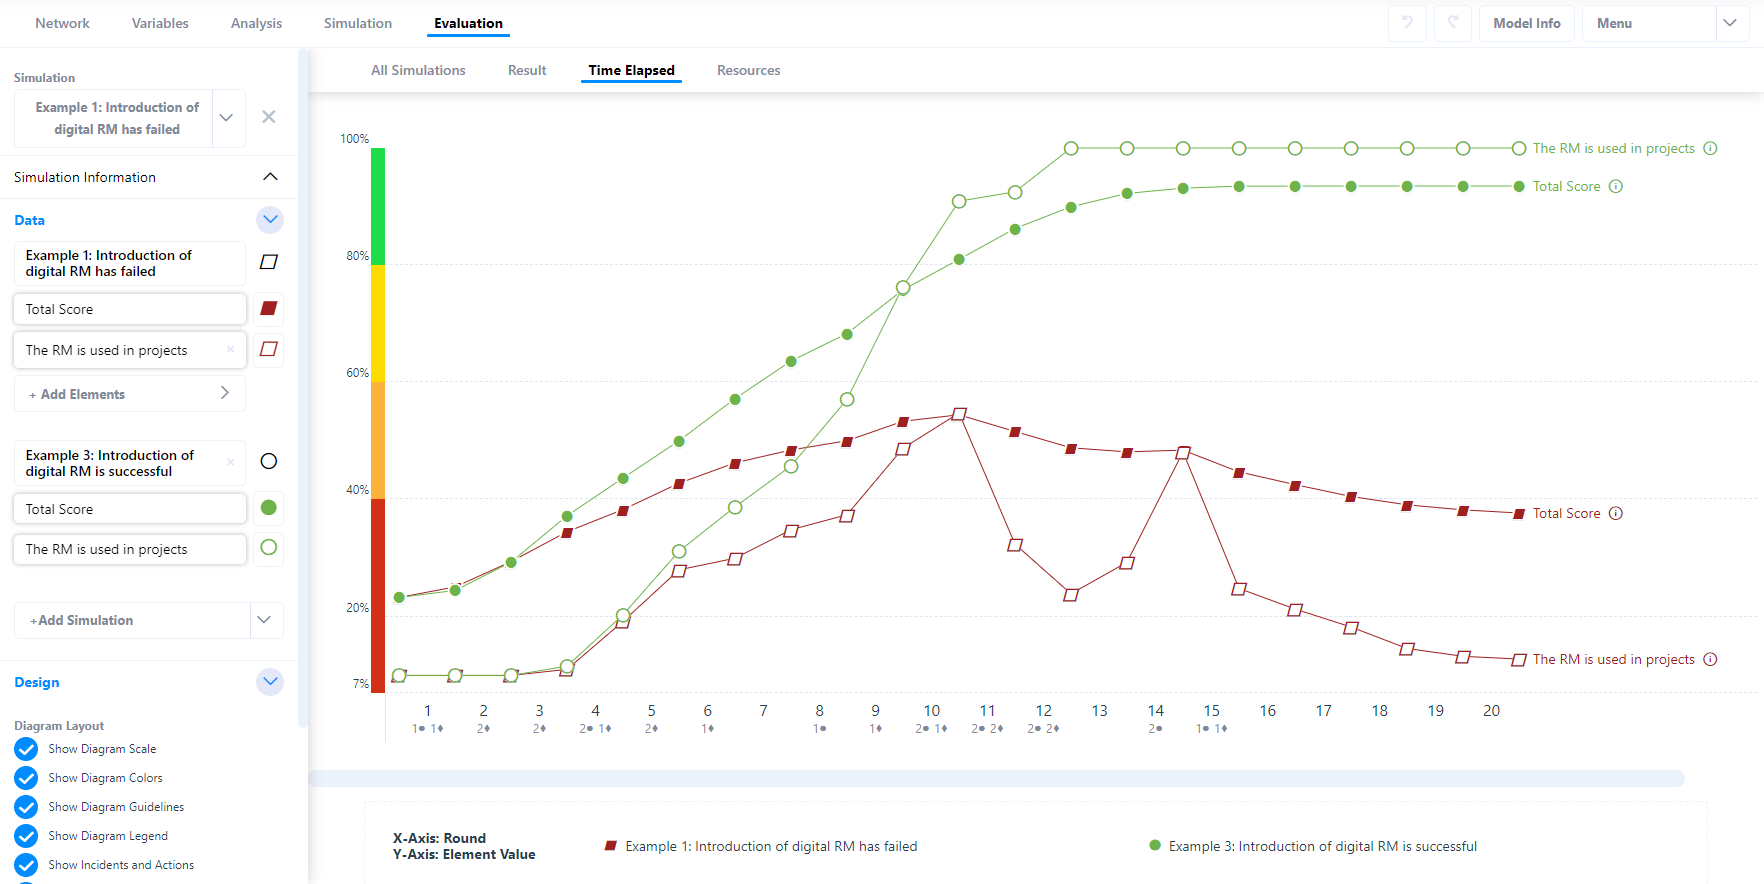
 

Overview evaluation

In the evaluation area, you will find various options for analyzing and comparing realized simulations. You can choose between different display formats and adjust them according to your needs, as well as flexibly select the displayed data.


You will be provided with detailed information on model creation and simulation in simcision in the following manual sections.


Model management

Overview

Once you have logged in to simcision, you will be automatically redirected to the my models section, provided you have a valid license.

  1. In the right area you can see all models in the currently selected folder. You can read more about this in the my models section.
  2. Use the menu to access the model repository of your teams. You can learn more about this in the teams section.
  3. Shared with me: In this folder you will find all models that other simcision users have shared with you.
  4. Example models: In this folder you will find public example models from simcision.
Shared with me

In the shared with me section you will find all models that have been shared with you by other simcision users. As soon as a user shares a simcision model with you, you will also receive an email that takes you directly to the shared model.

If the author makes changes to the shared model, these will be displayed to you the next time you open the model. You yourself can open shared models and – if this has been released by the author – save them as a copy in your model repository via the copy to my models button, but you cannot make any changes to the shared model itself.

For more information on sharing models, see the manage models section.

Example models

In the example models section you will find public example models from simcision. Some of the models are available for viewing only, other models can be saved as a copy in your model repository using the copy to my models button and can then be used as a template for your own models.

My models

The my models area represents your personal model repository. Models that you create and save here can only be accessed by yourself. However, you have the possibility to share individual models with other simcision users. You can learn more about this in the manage models section.

  1. In order to structure your model repository, you can create as many folders as you like.
  2. Click on the three dots next to the name of a folder to rename, duplicate or delete it.
  3. Click on new model to create a model in the currently selected folder.
  4. Use the import model button to open a locally saved model file in simcision.
  5. Click on open to edit a model.
  6. The manage button opens the single view of a model. There you can move, export, share, etc. models. You can read more about this in the section manage models.
  7. This button allows you to customize the display and order of your models.
Sort models
  1. You can sort your models either by modification date or alphabetically.
  2. You can have the model description displayed in the model overview. You can edit the description of a model in the individual view of the model. You can find out more about this in the section manage models.

Manage models

Click the manage button on a model to open the individual view of the model.

  1. Using the edit button, you can adjust the model title and description.
  2. Click the move button to move the model to another folder or team.
  3. When you lock a model, it is protected against (unwanted) changes. You can still open the model, but you can save changes only as a copy (function is available for team administrators only)
  4. Click the download button to export a model and thus save it to your local storage device.
  5. In the share section you can share the model with other simcision users.
Share

The share model button allows you to share a model with other users.

  1. In the select user area, you will see all users with whom you have already had contact in simcision (Organization, Team, Share).
  2. Alternatively, you can enter the email address of additional people to share the model with them. You can also copy a list of email addresses into this field.
  3. In the receiver section you will see a summary of your selection.
  4. Confirm your entry by clicking the share button.

After sharing, the single view of the model shows you all users with whom the model is shared. By default, users can only view the model, but cannot continue working with it. Modifying the shared model by another user is not possible at any time. However, teams allow you to have a shared model repository.

  1. Activate the can copy button to allow the user to make a copy of the model.
  2. You can cancel the permission at any time using the delete icon.
You can remove a model via the "delete model" button. Please note that deleted models cannot be restored.

Teams

Open the menu on the left to switch from your personal model repository (my models) to your team areas. In the menu, all the teams you are a member of are displayed below the associated organization. Click on a team to open its model repository. On the right side, you will see an overview of the team members.

By clicking the manage team button at the bottom right, you can access the settings of a team and leave it. You can find more information about team management here.

The model repository of a team is basically structured in the same way as your personal model repository. You can find more information about this in the section my models. In addition to the modification date of a model, you can see by which team member the model was last edited.

Model editing

Models and folders in a team area can be created, edited, moved and deleted by all members. Models can be opened by multiple team members at the same time.

Please note: Synchronous editing of a model by several users at the same time (with mutual transmission and display of changes) is not possible.

If you want to save changes made to a team model that has been modified and saved by another team member since you opened the model, you will be notified of the save operation. You then have the option …

  1. to overwrite the changes made in the meantime by another team member with your model version
  2. to reject your own changes to the model
  3. to save your changes as a copy of the model to keep both versions
Locking models

Models in a team can be locked only by members with the admin role. Locked models can be viewed and copied by all team members, but not modified. For more information, see the manage models section.


Simulation games

In simcision you can create a simulation game out of a model. Simulation games are closed simulation models whose effect network and variables are protected against changes. When you open a simulation game, only the analysis, simulation and evaluation sections are available.

To save a model as a simulation game, first open it and then select save as business game in the top left menu. You will then be asked to enter a name and author for the simulation game.

The registered author of a simulation cannot be changed or overwritten. The information is retained even if the simulation is copied, moved, as well as exported and re-imported.

Regarding all other functions, simulation games do not differ from open models in simcision. They can be saved (to preserve performed simulations), renamed, exported and shared with other users. More information about managing and sharing models can be found in the section manage models.


Organizations

Purchase organization

  1. When purchasing an organization license, please first choose an individual name for your organization that will be displayed to your members.
  2. Then you can enter how many licenses and team areas your organization should contain. Each organization consists of at least one license (for you as the owner) and one team area.
Number of licenses

You can manage the licenses of an organization individually and assign them to other users as floating licenses. You can learn more about this in the section Managing Members.


Number of teams

Team areas provide you and your team members with a shared model repository. Team members can be either members of your organization or external guests. Therefore, you can use teams even if you have only one simcision license in your organization, provided that your team members purchase a simcision license themselves. You can read more about this in the teams section.

Managing members

In the settings section, select the organization you want to manage. In the members section you can manage the members of your organization. By inviting other people as members of your organization, you provide them with a simcision license. Therefore, you can only invite as many members as your organization has licenses. If you want to invite additional members, you can always add more licenses to your organization. You can find more information about this in the section Manage organization.

Invite members

Click the invite members button to add new members to your organization.

  1. In the add email text box, you can enter individual email addresses or a list of email addresses.
  2. If you select a role and license duration before adding e-mail addresses, these settings will be applied to all members.
  3. After you have entered e-mail addresses, you will again have the option to edit the role and license duration of individual users.
  4. Then complete the invitation by clicking the invite users button.
Internal members and externals

When assigning licenses, you can distinguish between internal members (“member” role) and external members (“external” role). Internal members can see all other internal members, including their email address and role in the organization. External members only see the name of the organization and you as the contact person, but no other members.

Role „admin“

You can assign the “admin” role to internal members. Admins can …

  • Invite new members to the organization (if free licenses are available).
  • Remove existing members from the organization
  • Assign or remove the admin role to other members
  • Manage teams and join all existing teams independently
License duration

For each member of your organization, you can optionally set a license expiration date. Once a license expires, the user is automatically removed from your organization. The license is then available to you again and can be reassigned. This feature helps you to reduce the administration effort for numerous members.

Manage teams

In the settings section, select the organization you want to manage. In the teams section below the member management, you can create new teams or delete existing ones. You can create only as many teams as your organization includes. If you want to create additional teams, you can always add more team areas to your organization. For more information, see the manage organization section.

ATTENTION: If you delete a team, all the models it contains will also be deleted. A team and its models cannot be restored after deletion.
Manage teams

Select a team to manage its members and their roles. The invite members button allows you to invite either members of your organization or external guests to the team. All members of a team can see which users are members of the team. The admins of your organization can also join all teams without invitation by selecting the team in the organization overview and clicking join team.

Manage roles

Each team member can have either the member or admin roles. A team admin can manage the members of a team (invite new members or remove existing members). In addition, an admin can lock models in the team’s shared model repository, protecting them from being edited by team members. More information about locking models can be found here.

Shared model repository

Each team has a shared model repository that all team members can access.

  1. You can reach the model repository of a team by clicking on the name of the team in the menu.
  2. On the right side you will see an overview of all team members. As soon as you move the mouse over an icon, the full name is displayed.
  3. The manage team button leads you to the settings.
  4. The model repository is structured in the same way as your personal model area (my models). You can find more information here.

Manage organization

  1. In the settings section you own for an organization, scroll down to get to the organization settings.
  2. You can cancel your subscription by disabling auto-renewal. Your license will then be available until it expires.
  3. You can edit the number of your teams and licenses here anytime.
  4. You can appoint one or more deputies for your organization.
Please note: You can only adjust the automatic renewal as well as the number of your licenses/teams if you have booked your license via the simcision platform. For customization or renewal of individual license packages please contact your simcision contact person.
Adjust number of licenses and teams

To adjust the number of your booked licenses and teams, first click the gear icon next to your licenses and teams in the organization settings and then click the reorder licenses/teams button.

In the following dialog, adjust the total number of licenses and teams that your organization should include in the future according to your wishes.

When booking additional licenses or teams, they will be provided to you on a pro-rata basis for the remaining subscription period after you submit your order. So if your subscription is renewed the next time after 6 months, you will receive an invoice for the added licenses/teams over 6 months.

When reducing licenses or teams, they will remain active until the end of your current subscription and will be automatically deleted at the beginning of the next calculation period.

Appoint deputies

You can appoint as many members as you like as deputies for your organization. Deputies have the same permissions as the owner. They can purchase new licenses/teams, cancel the subscription, and appoint a new owner for the organization.

Warning: Deputies of an organization can also change its owner or remove it from the organization.

Reactivate expired organization

If you disable your organization’s auto-renewal and your subscription ends, all members of the organization will lose their license and therefore lose access to your account and models. Likewise, the guests in your teams will no longer be able to access them.

Accounts that no longer have an active simcision license will be deleted after 60 days and cannot be restored afterwards – including all your models.

Before the 60 days expire, you have the option to reactivate your organization. All member settings, teams and models will be preserved. To reactivate an organization, log in to simcision and click on the reactivate organization button in the settings section of the corresponding organization.

If you have another simcision license (e.g. single user license or second organization license), your account will not be deleted. You then have 6 months to reactivate an expired organization. Otherwise the organization will be deleted completely.

Please note: Your organization settings (members and teams) as well as the models in team areas will only be preserved if the organization is reactivated. When acquiring a new organization, the settings and content cannot be transferred.

Getting started

Registration and Login

In order to use simcision, you need a simcision account and a valid simcision license. Open simcision in your browser or download the simcision app.

If you are not registered yet, you can create a simcision account via the create account function. If you already have an account, you can log in directly with your login data.

Registration

Create your account by entering your data, agreeing to the T&Cs, Terms of Use and Privacy Policy and then click register.

You will receive an email immediately. Confirm your registration and assign a personal password for your account.

Enter your personal password and confirm the entry with a repeat. By clicking on “set password” you will be redirected to the simcision start page.

License

In order to use simcision, you must either purchase a simcision license or be invited to join an organization by another simcision user.

If you do not have a simcision license yet, you will be automatically redirected to the account overview after logging in. Select the license you want to purchase here and follow the instructions of the ordering process. An overview of simcision licenses can be found here.

Once you own a simcision license or are part of an organization, you can view and manage it in the settings.


simcision App

Here you can access the free download of the simcision app. Select the version you would like, and the download will begin. Once it’s downloaded, open the installation file and run the installation. Afterwards, the app opens and you can log in with your login data.

Account management

You can find the account management in the menu on the left side under the item settings.

Under the item profile, you have the possibility to view and manage your personal data and contact information at any time.

Under the item subscriptions, you get an overview of all current and expired simcision licenses that you have purchased and paid for yourself. You can manage active licenses or purchase new licenses. Organizations of which you are only a member, but which you cannot manage yourself, are only displayed in the menu on the left side in the section organizations and teams.