Impacts
# About impacts
An impact always goes from one element (source element) to another element (end element). If the value of the source element changes, the value of the end element also changes.
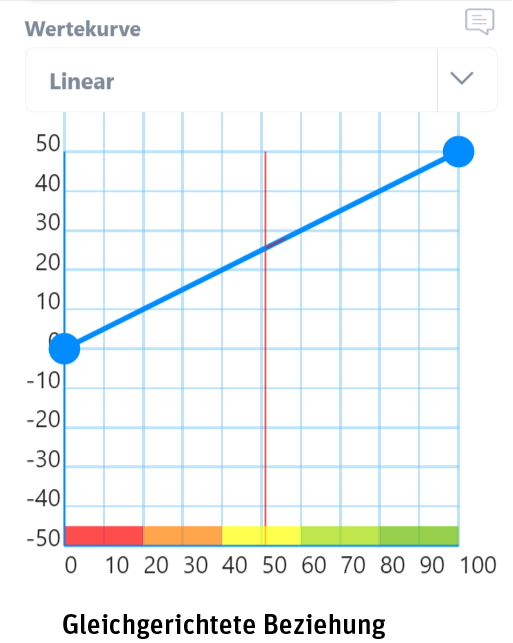
The impact can be in the same direction:
- The more…, the more…
- The less, the less…
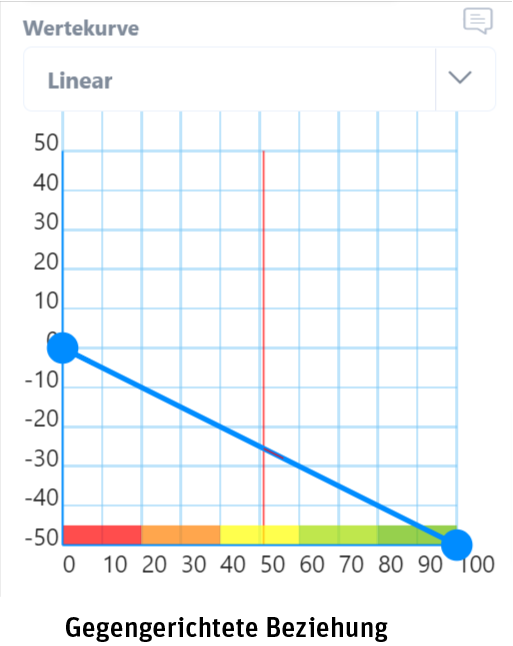
Or in the opposite direction:
- The more…, the less…
- The less…, the more…
Impacts are represented by a single dotted arrow connecting the outgoing element with the end element.
# Create
An impact between two elements can be created in various ways:
In the network
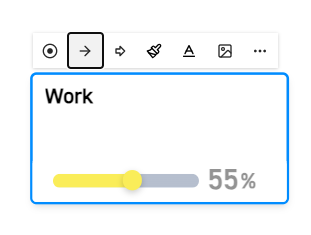
- Select the source element in the network so that the editing bar appears.
- In the editing bar of the element, click on the button to create the impact.
- Click on the desired end element in the network.
- In the pop-up window that appears, click on “Create impact”.
- The impact is created and selected. You can set the impact strength and alignment in the sidebar or in the effect pop-up menu.
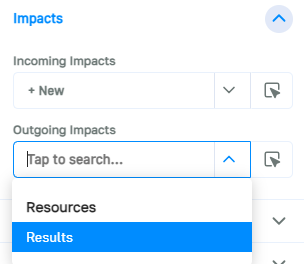
In the element menu
- Select a desired output element or end element.
- Show the side menu and open the “Impacts” section.
- If the selected element is to be the output element, open the dropdown under “Outgoing impacts” and select an end element. Vice versa for an incoming impact.
- The impact is created. You can set the impact strength and alignment in the sidebar that appears.
# Mode of impact
In the “Mode of impact” tab in the action menu, you can set the extent to which a change in the state of the output element affects the end element.
The impact type determines how the effect is transferred: “Rectified” (the more A, the more B), “Reverse” (the more A, the less B) or no impact (no transfer, purely for documentation purposes).
The impact strength determines how strong the maximum change in the end element should be.
Example: The impact strength is 50 and the output element is a target with a value range of 0-100%. Both the output element and the end element have a status of 0%. If the value of the output element now increases from 0% to 100% in one simulation step, a pulse of 50 is given to the end element via the effect. (With standard settings)
If the output element had risen from 0 to 50%, only a pulse of 25 would have been applied to the end element.
Once the strength has been determined, the type of transfer can be further adjusted: In the influence curve, you can specify how much the end element should increase based on the value of the output element.
The curve is always evaluated if the value of the output element has changed in a simulation step.
The pulse passed on is calculated as follows:
- First, the value of the curve before the change is taken.
- Then the value of the curve is calculated with the new value of the output element.
- The difference between these two values is the new impulse that is passed on via the impact.
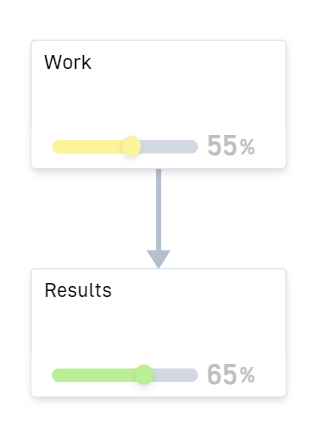
Example:
- Output element “Work” is set to 20%. The value of the curve is 10.
- After a simulation step, “Work” is now set to 40%. The new value of the curve is 20.
- The difference between the two results arrives at the end element as a pulse. Therefore, the end element “Results” now receives a pulse of +10 (20 – 10).
The curve can be set manually, but you can also choose from a range of predefined curves:
- S-curve
- Linear
- Saturation
- Exponential
- Plateau
- Gaussian curve
Alternatively, you can also define an exact curve by selecting the individual formula curve type. With this setting, you will receive an input field in which you can enter a formula. The formula has the format “f(x) = …” where x is the current value of the output element. Mathematical operators (+, -, /, *), brackets and functions can be used in the formula.
Available functions:
| abs(A) | Absolute value of A: abs(-5) = 5 |
| ceil(A) | A, rounded up: ceil(5.1) = 6 |
| fix(A) | A, Rounded towards 0: fix(-5.7) = -5 |
| floor(A) | A, rounded down: floor(5.9) = 5 |
| mod(A, B) | Modulus of A (remainder of an integer division): mod(5, 4) = 1 |
| round(A) | A, rounded: round(5.3) = 5 |
| sign(A) | Sign of A: sign(-5) = -1 |
| sqrt(A) | Square root of A: sqrt(9) = 3 |
| square(A) | A squared: square(3) = 9 |
Curves in the same direction always run from 0 into the positive range, whereas curves in the opposite direction always run from 0 into the negative range.

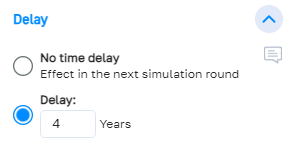
# Delay
Under the “Delay” tab, you can set how many time units should elapse between the change occurring at the outgoing element and the effects on the end element.
By default, an impact is evaluated directly after a simulation round, so the impulse arrives at the end element in the next round. It is possible to delay the arrival of the impulse by an unlimited number of rounds.