Events
# Create
Events influence the course of the game and exert an influence on the elements according to a previously defined framework. In this way, they show how events, based on reality, can affect both elements and resources without active intervention. In addition to having a direct effect on the model, events can also have a long-term influence on the model through subsequent events.
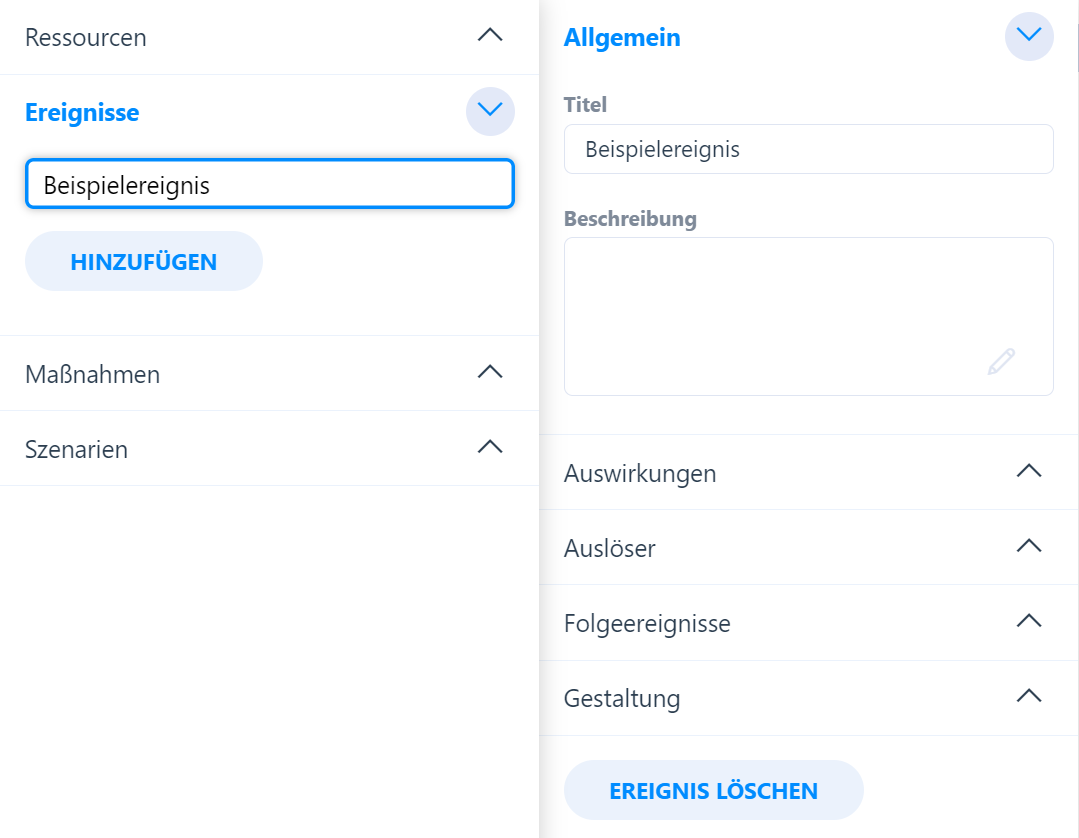
Any number of events can be added to each model. To create an event, click on “Add” under the “Events” tab. As soon as the event has been created, you can describe it in detail under the “General” tab and rename it at any time.
# Effects
Events can change the status of elements or resources in a simulation. This is done with the help of “Effects”.
The elements and resources that are affected by the event can be selected under the “Effects” tab. To select an object, you can either click on “Select” to choose it from a list or on the arrow symbol next to it to mark it in the network.
You can remove elements from the effects or add new ones at any time.
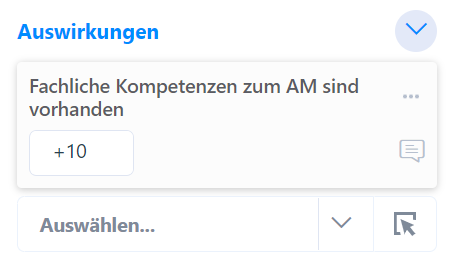
The selected elements/resources appear in the list of effects. You can use the text field for each effect to determine the strength of the influence.
Example: We have created an effect for the element “Technical skills for AM are available”. A value of “+10” is entered in the text field. If the event occurs, the status of this element is increased by ten points.
Effects over multiple rounds
By default, the effect is calculated in the round in which the event occurs. However, you can also spread the effect over several rounds. To do this, click on the title of the effect; a menu will open in which the “Effect over multiple rounds” tab is located.
In this tab, you can enter in which rounds which effect should occur.

Advanced effect formulas
The text field for entering the effect value supports a range of different possible entries.
Simple forms
| +10 | Add ten points |
|---|---|
| -10 | Subtract ten points |
| =10 | Set the status of the affected element to 10 |
Variables
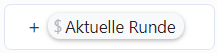
You can use some predefined variables to make the effect dependent on the current state of the model in the simulation. Simply enter $ in the text field to display a selection of possible variables.
| $Status | Current status of the affected element (value between 0 and 100) |
|---|---|
| $Maximum Status | Maximum status of the affected element. 100 by default. |
| $Minimum Satus | Minimum status of the affected element. 0 by default. |
| $Current Round | Number of the current round (1 in round 1, 2 in round 2, etc…) |
Example
The affected element is affected differently depending on the round in which the event occurs. In round 1: +1; but in round 10: +10.
References
You can include the status of other elements or resources in their effect. Simply tap @ to reference another object in the simulation and select the desired object in the selection.
Example
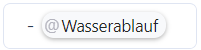
The status of the affected element is reduced by the value of the “Water drainage” element in the entry round.
Calculations
Values can also be offset against each other. The input field supports simple mathematical symbols. (+, -, *, /, “(” and “)”)
Example

The affected element is influenced in inverse proportion to its current state: It receives +20 if it currently has a state of 0, but +0 if its state is 100.
Functions
Functions can be used to generate values that cannot be achieved with simple calculations. Tap # to call up the selection of available functions.
Available functions
| random between (A and B) | Results in a random (integer) number in the specified range, between number A and B (A and B included). |
|---|---|
| modulo (A mod B) | Remainder of a division. Example: modulo(4 mod 3) = 1; |
| smaller value (A or B) | Selects the smaller of two values. Example: smaller value (3 or 7) = 3 |
| greater value (A or B) | Selects the larger of two values. Example: larger value (3 or 7) = 7 |
| rounded (A) | Rounds the number A. Example: rounded(4.3) = 4 |
| rounded down (A) | Rounds the number A down. Example: rounded down(4.7) = 4 |
| rounded up (A) | Rounds the number A up. Example: rounded up(4.1) = 5 |
| absolute (A) | Removes the sign of the number A, is always positive. Example: absolute value(-4) = 4 |
| sign (A) | Results in -1 for a negative number, +1 for a positive number and 0 for 0. Example: sign(-56) = -1 |
| square root(A) | Returns the square root of A. Example: root(16) = 4 |
| exponent(A ^ B) | Returns A to the power of B. Example: exponent(4 ^ 2) = 16 |
| e to the power of(A) | Returns e to the power of A. Example: exponent(1) = 2.718281828459 |
| if(A then B else C) | If A is not equal to 0, B returns, else C returns. |
Example
![]()
A random number between 2 and 15 is added to the affected element. (2 and 15 are inclusive)
# Triggers
With triggers, you can define the circumstances under which the event occurs. Each trigger has a number of freely adjustable conditions that can be set in the Trigger menu.
You can assign any number of triggers to an event. All triggers are independent of the others and their conditions are checked individually. As soon as one of the triggers is activated, the event occurs.
The triggers can be opened and edited individually.
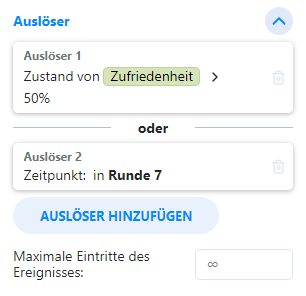
The conditions for each trigger can be set up in the Trigger menu.
Each trigger can have any number of entry conditions. The trigger is only triggered and the event occurs if all the conditions for a trigger are met.
A new condition can be created using the “Add condition” button. This new condition opens in the conditions menu, in which you can set the exact circumstances under which the trigger should be activated. All created conditions can be deleted or changed at any time.
→ Learn more about conditions
Triggers without conditions can trigger the event at any time (in every simulation round).
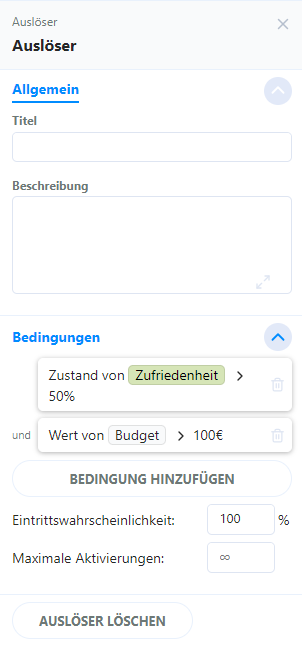
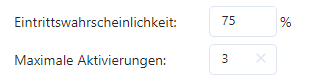
A probability of occurrence can be defined for each trigger. This probability of occurrence applies in addition to the conditions: It is first checked whether ALL conditions apply, then the system “rolls the dice” for the probability of occurrence – depending on the result, the trigger triggers the event (or not).
Finally, a maximum number of activations can be assigned to each trigger. This determines how often a trigger can trigger the event in the course of the simulation. If the maximum frequency is reached, this trigger is deactivated for the simulation. Other triggers are not affected by this and can continue to trigger the event.
Triggers that contain several conditions only occur if ALL conditions of the trigger are fulfilled at the same time. (AND-link)
You can assign a higher-level maximum frequency to the event. This limit ensures that the event is not triggered more often than specified here.
# Dependent events
Enables events to be linked. A dependent event can be selected from the list of events using the “+new” button. For each dependent event, you can specify after how many rounds and with what probability it should occur.
When a dependent event is created, a new trigger is created for this event.
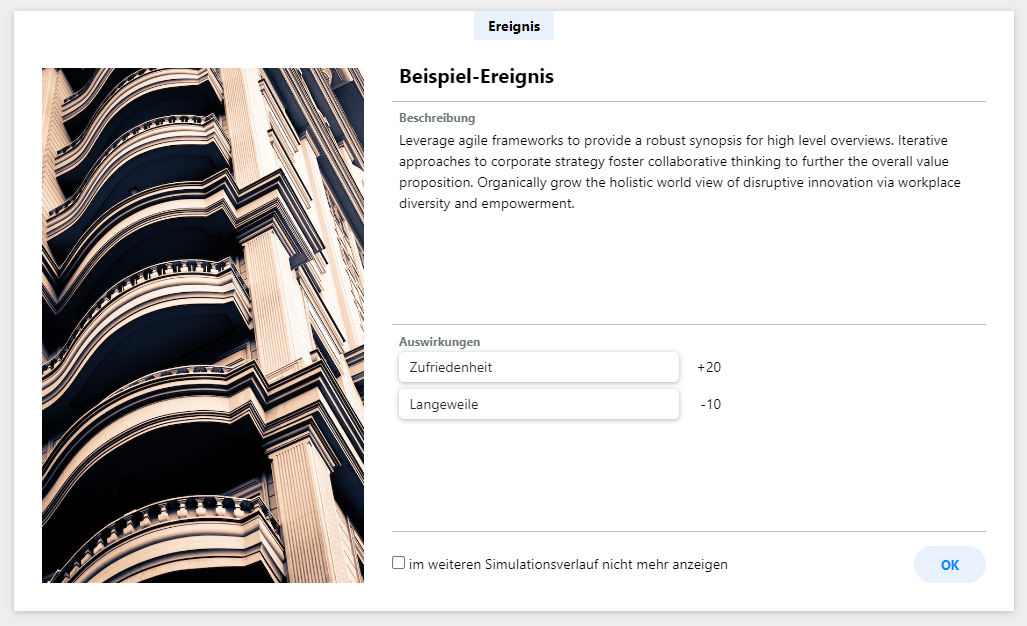
# Design
Allows you to add a suitable image to the event.
The image appears in the event hint window that is displayed during the simulation.
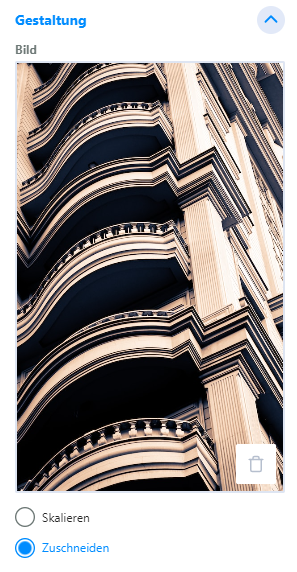
The image area in the notification window has a size of 322*515 pixels. Ideally, the image should have exactly these dimensions.
You can set whether the image should fill the image area completely (“Crop”) or be reduced in size until it fits into the image area (“Scale”). Images in landscape format may only fill half of the available area with this setting.